Setting up a Windows 95 peer-to-peer network
Before beginning this setup process, ensure that your network card is properly installed
and configured. To begin the peer-to-peer setup, go to the Start menu and
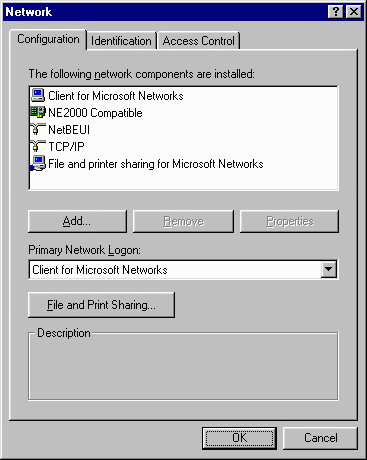
select Settings, Control Panel. Double click the Network
icon. You need to have both Client for Microsoft Networks and File
and printer sharing for Microsoft Networks installed.
If you do not have these components installed yet, follow these instructions.
To install Client for Microsoft Networks, click the Add...
button. From the list of network component types, choose Client.
In the Manufacturers list choose Microsoft, and in the Network
Clients list choose Client for Microsoft Networks. Then press OK.
This will bring you back to the Network window. If you need to install File
and printer Sharing for Microsoft Networks, click the Add...
button and choose Service:
Next, in the Manufacturers list, choose Microsoft, and
from the Network Services list, choose File and printer sharing
for Microsoft Networks. Press OK.
Now you will be back at the Network window. With these components
installed, you can continue the installation.
Click the File and Print Sharing... button.
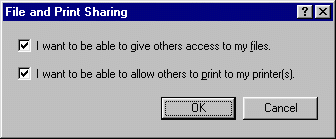
Check the boxes according to what resources you want to make available on your computer.
Click OK.
Next, at the Network window, click the Identification
tab.
You can leave the default values, or set them to something more appropriate to you. The Computer
Name and Workgroup values are not case-sensitive. The Computer
names should be different for each computer, the Workgroup names should be the same.
Click the Access Control tab.
Make sure that Share-level access control is selected. User-level
access control is meant for use in a Windows NT domain.
Press OK at the Network window. You will be prompted to
restart your computer.
Click Yes.
After restarting, open Control Panel again, and click the Network
icon. Verify your installed network components against the ones in this window:
Your list may not look exactly like this one, but you should have these five components at
least.
Now select the NetBEUI protocol and click Properties.
Make sure there is a check mark beside both Client for Microsoft Networks
and File and printer sharing for Microsoft Networks.
Click the Advanced tab. Check the option at the bottom that says Set
this protocol to be the default protocol.
Now click OK. If you are prompted to restart your computer, click Yes.
To verify that everything is set up properly, double click the Network
Neighborhood icon on your desktop. You should see an icon for Entire
Network, an icon for your computer, and an icon for any other computers on the
same network as yours.
If you see an icon for your computer, then all has gone well, and you can set up some
shared resourses. To do so, open the Windows Explorer by selecting Programs,
Windows Explorer from the Start menu. In Explorer, right
click on any drive, folder or printer and choose Sharing... from the
shortcut menu.
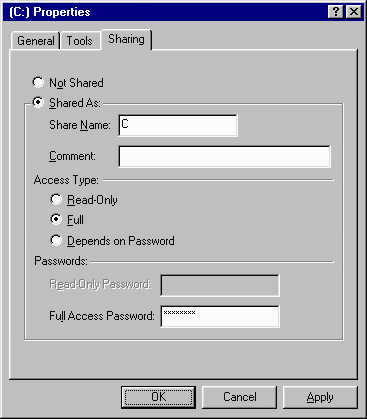
Select the option Shared As to make this resource available on your
network. Choose a name by which other computers will access the resource. Select the type
of access they will have. If you select Read-Only, other users will be
able to see and download files in this area. If you choose Full, others
will be able to not only see and download these files, but also modify and delete them.
Remember that if you are connected to the Internet, everyone in the world will have
potential access to your computer, so be careful in choosing your passwords.
Once you have shared a few resources, go back into Network Neighborhood
and double click on your computer name. You will see a list of all the resources you have
shared. You can also map a drive letter to any of these resources. To do this, right-click
on the Network Neighborhood icon on your desktop and choose Map
Network Drive... from the shortcut menu.
Select any drive letter to represent the resource, then type in the network path to the
resource. A network path is in the format \\ComputerName\ResourceName. So
for a resource named C on a computer named YOURS, the
network path would be \\YOURS\C. Once you have mapped a drive, you can
use as if it were a local drive and run programs, copy files, and so on.
To use resources located on another Windows 95 computer, that computer must be set up in
the same way.
|